Connect Amazon SES to RadarSend
Amazon SES (Simple Email Service) is AWS’s email sending service. This guide walks you through connecting it to RadarSend.
Before you begin#
- An AWS account with SES set up in one region. If you’re new to AWS, start with Set up Amazon SES from scratch.
- Access to your sending domain’s DNS (so you can add records at your DNS host or registrar).
- A RadarSend account with admin access.
Step 1 — Get your Amazon SES credentials#
Do all of this inside a single AWS Region (for example, US East (N. Virginia), us-east-1). SES is region-scoped, so everything below must live in the same region you’ll send from.
- Sign in to the AWS console and open Amazon SES. Use the region switcher in the top-right corner to pick the region you’ll send from, and keep that choice consistent.
- Verify your sending domain. Go to Amazon SES→Verified identities→Create identity→Domain, enter your domain, and create it. SES then shows a set of DKIM CNAME records (usually three). Open the identity’s Authentication tab, expand View DNS records if needed, and add those CNAME records to your domain’s DNS. Verification completes automatically once SES detects the records. This can take up to 72 hours, though it’s often much faster. RadarSend doesn’t create identities in your account, so this step is always done in the SES console.
- Set a custom MAIL FROM domain while you’re there (on the identity, under Custom MAIL FROM domain, for example
mail.yourdomain.com). Without one, SES sends from anamazonses.comreturn path, so SPF passes for Amazon’s domain rather than yours and doesn’t count toward DMARC alignment. SES shows the MX and TXT records to add.
- Set a custom MAIL FROM domain while you’re there (on the identity, under Custom MAIL FROM domain, for example
- Request production access (leave the SES sandbox). New SES accounts start in a sandbox where you can only send to addresses you’ve verified, up to 200 emails a day. In Amazon SES→Account dashboard, find the sandbox notice and choose Request production access. The form asks for your mail type (Marketing or Transactional), your website URL, up to 4 additional contacts, your preferred contact language, and an acknowledgement checkbox. There’s no longer a box to describe your use case, but AWS may follow up on the support case it opens, usually within 24 hours. Do this before you send to real recipients. (Check the current AWS console, as screens change over time.)
- Create an IAM user with access keys. RadarSend signs in to SES using an AWS access key pair.
- Open the IAM console → Users→Create user, and give the user a name (for example,
radarsend-ses). - On the permissions step, attach a policy. RadarSend shows the IAM policy (JSON) to use in the credentials step of the connect wizard. Attach exactly that policy so the permissions match what RadarSend needs. See What the IAM policy allows below.
- After the user is created, open it, go to the Security credentials tab, and under Access keys choose Create access key. Pick the Other use case if prompted, then create the key.
- Copy the Access Key ID (starts with
AKIA…) and the Secret Access Key. The secret is shown only once, so save it now. Also note the Region you’re working in.
- Open the IAM console → Users→Create user, and give the user a name (for example,
Step 2 — Add the sending service in RadarSend#
-
In RadarSend, go to Settings→Sending→Sending services and click + Connect a service.
-
In the wizard, on Choose your sending service, pick Amazon SES, then click Continue.
-
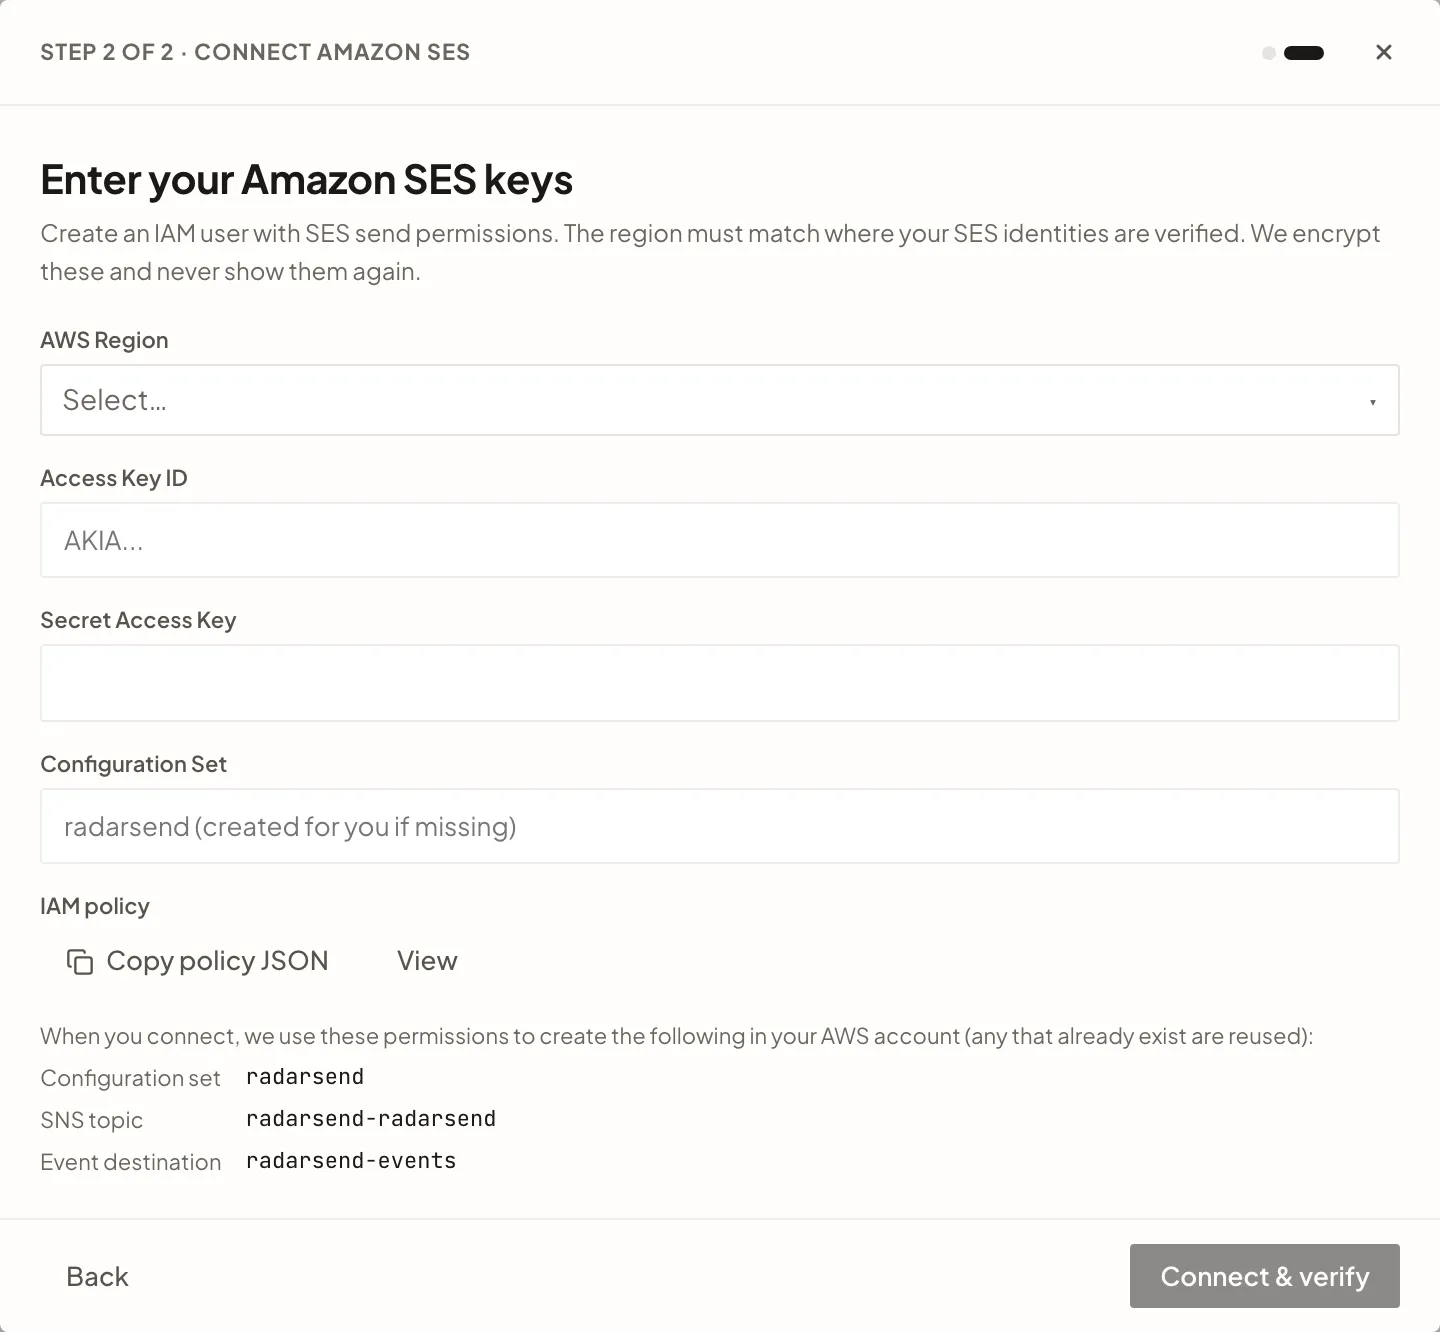
On Enter your Amazon SES keys, fill in:
- AWS Region — required, with no default. The list shows region codes (
us-east-1,eu-west-1, and so on). Pick the region where your domain is verified. - Access Key ID and Secret Access Key — the pair you copied in Step 1.
- Configuration Set (optional) — leave it blank and RadarSend uses one named
radarsend, or type the name of your own.
This screen also shows the IAM policy to attach to your IAM user. If you haven’t already, use Copy policy JSON and attach it to that user. Then click Connect & verify.
- AWS Region — required, with no default. The list shows region codes (
RadarSend runs a live connection test against SES and shows Connected · {region} · {rate}/sec when your keys work. Connected means the keys work. It doesn’t mean the account is out of the sandbox. If it’s still in the sandbox, the wizard adds · Sandbox and a note with a Request production access link for that region.
Step 3 — Delivery, bounce & complaint tracking#
RadarSend sets this up for you as part of Connect & verify. Once the connection test passes, the wizard shows Setting up event webhooks…, then Event webhooks configured. In your AWS account it creates:
- the configuration set
radarsend(or the name you typed), - the SNS topic
radarsend-<configuration set>(for exampleradarsend-radarsend), subscribed to RadarSend, - the event destination
radarsend-eventson that configuration set, publishing BOUNCE, COMPLAINT, DELIVERY, and REJECT events to the topic.
Any of these that already exist are reused, not duplicated.
To check it later, open the service at Settings → Sending → Sending services → your service. The Webhook delivery section shows Configured with four triggers: Bounce, Spam Complaint, Delivery, and Rejected. Click Re-check to run the check again. Configure webhooks (or Re-configure webhooks) only appears when something needs fixing, for example if setup failed because the IAM policy was missing a permission. Fix the cause, then click it to retry.
Step 4 — Check your account and domains in RadarSend#
The service’s page also shows what SES reports about your account. RadarSend reads this; it doesn’t change it.
- Amazon SES account shows Access (Sandbox or Production), your 24-hour quota (“12 of 200 sent in the last 24 hours”), and your Max send rate. While the account is in the sandbox, a note links to Request production access in the SES console for your region. The numbers come from the same check RadarSend already runs every 15 minutes to pace your sends; Re-check fetches them from SES again (at most once every 30 seconds).
- Verified sending domains lists the identities in your SES account for that region, each with its status (Verified, Pending, or Failed), plus DKIM, custom MAIL FROM, and whether SES lets it send. Each identity links to its page in the SES console. The list loads when you open the page and Re-check refreshes it.
Custom MAIL FROM, dedicated IPs, quota increases, and Virtual Deliverability Manager are all set up in the SES console. The Open the SES account dashboard link takes you there.
Step 5 — Confirm your sending address#
- Go to Settings→Sending→Senders and click + Add sender.
- Enter your Sending address, then click Continue. Add a Display name and Reply-to, pick which email types this sender handles, and click Continue.
- On Tracking & confirm, choose this service under Sending service (this only appears if you have more than one), enter a test recipient, and click Send test.
- When the test is accepted, click Save sender.
If SES rejects the test, RadarSend shows Amazon SES didn’t accept this address with SES’s reason, what SES currently says about the domain (for example Pending, with its DKIM status), or that the domain isn’t on the account in that region yet. It then tells you to verify the domain in SES in the connected region, with an Open Verified identities in Amazon SES link, and to retry. While the account is in the sandbox, the test recipient must also be a verified address in SES, and the message says so.
What the IAM policy allows#
The policy in the connect wizard is the only access RadarSend has to your AWS account:
- Sending:
ses:SendEmailandses:SendRawEmail. - Account status:
ses:GetAccount, for the connection test, the sandbox and quota display, and send pacing. - Domain status (read-only):
ses:ListEmailIdentitiesandses:GetEmailIdentity, for Verified sending domains and the status shown when a test send is rejected. These two were added in September 2026. If you attached the policy before then, the domain list says Add ses:ListEmailIdentities and ses:GetEmailIdentity to your IAM policy to see domain status and offers Copy policy JSON. Everything else keeps working without them. - Event tracking:
ses:CreateConfigurationSet,ses:GetConfigurationSetEventDestinations,ses:CreateConfigurationSetEventDestination,ses:UpdateConfigurationSetEventDestination,sns:CreateTopic,sns:Subscribe,sns:Unsubscribe, andsns:ListSubscriptionsByTopic.
It has no permission to create, change, or delete identities.
Common issues#
- Still in the SES sandbox. In the sandbox you can only send to verified addresses, up to 200 messages a day. The Amazon SES account section on the service’s page shows Sandbox until AWS grants production access. Request it (Step 1) before sending to real recipients.
- Region mismatch. This is one of the most common SES errors. Your access keys, the region you pick in RadarSend, and the region where your domain is verified must all match. Verifying a domain in one region does not verify it in another, and Verified sending domains only lists the connected region.
- Domain not verified or DKIM not propagated. DNS changes can take time to spread. Verified sending domains shows the DKIM status SES reports; confirm the DKIM CNAME records are present at your DNS host.
- A permission is missing. When your IAM user lacks a permission, RadarSend names it, for example “Your IAM user isn’t allowed to call ses:GetAccount. Re-attach the IAM policy from the Amazon SES connect wizard (Copy policy JSON), then try again.” Attach the current policy from the wizard; it has every permission listed above.
- Access keys inactive. If the connection test says Invalid AWS credentials, check in the IAM console that the access key’s status is Active, and that you pasted the full Secret Access Key without extra spaces.
Good to know#
- SES is region-scoped: each region is effectively a separate SES account with its own verified identities, sandbox status, and sending quota.
- SES charges per email. Your quota and rate appear on the service’s page in RadarSend and on the Account dashboard in the SES console.
- Configure webhooks and the account and domain checks use the service’s saved settings. If you’ve changed something on the page and not saved it, they’re greyed out until you click Save.