Sequence steps reference
This page lists every step you can add to a sequence and what each one asks you to set. It’s the reference companion to Build an email sequence, so start there if this is your first sequence.
To add a step, click the + between two steps on the canvas. The Add node menu offers seven: Send email, Wait, If / else, Wait for event, Go to sequence, Action, and Exit / goal.
Send email#
Sends one email from your Emails library. Click Pick email (or Change email) to open the picker:
- Subscription type — the email type this send belongs to. It’s what recipients unsubscribe from, and it decides which senders you can use.
- Send from — the sender to send through. It appears once you’ve chosen a subscription type, and you have to pick one. If none are listed, the picker says No verified sender for this subscription type yet, so confirm a sender for that type first.
- Search the Emails library… — find the email you want. Each row shows its current version. If it doesn’t exist yet, click New email… to write one in the library.
- Click Use this email.
Version pinning#
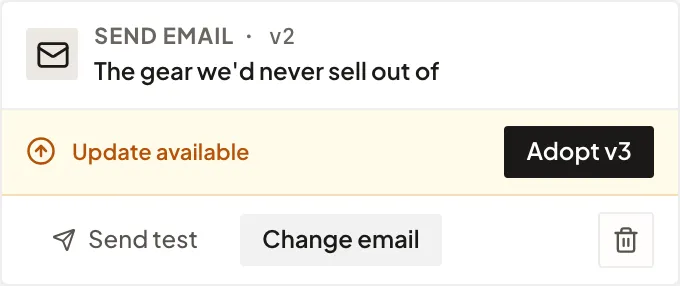
A send step is pinned to the exact version of the email you picked. The step’s card shows it next to the step name, as v3 for example. Editing that email in the library afterwards doesn’t change what this step sends.
When the library version moves ahead, the card shows Update available with an Adopt v4 button. Adopting is a deliberate choice you make on each step, so a library edit can never quietly change a live sequence. On a live sequence, click Edit steps first, then adopt and save.
Send a test#
With an email chosen, click Send test on the step. You get that step’s pinned email with [TEST] added to the subject, sent to up to 10 comma-separated addresses. Nobody is enrolled and the test doesn’t count in your reporting. If the step is brand new, Save draft first so it has something saved to test.
Wait#
Holds the contact before the next step. Under How should this step wait?, choose one of four modes:
- For a delay — Wait for a number of minutes, hours, days, or weeks. The default is 3 days.
- Until a date — Wait until this date, then continue. This date is in UTC.
- On a day of the week — Wait until the next… weekday, At (time of day) in 24-hour time, in your workspace’s timezone. Useful for “send it next Tuesday morning” pacing.
- Until an event happens — the same as a Wait for event step, below.
Wait for event#
Holds the contact until something happens, up to a time limit. It creates two paths: Event (it happened) and Timeout (it didn’t happen in time).
Under When the contact…, choose what to wait for:
| Event | What you set |
|---|---|
| Clicked a link | Link URL contains (blank means any link), an optional page topic, and a confidence floor |
| Visited a page | Page URL contains (blank means any page), and a confidence floor |
| Enters a segment / Exits a segment | Which dynamic segment |
| Is added to a list / Is removed from a list | Which static list |
| Contact field changes | The field, and optionally the changed-from and changed-to values |
| Activity occurs | Which activity. It fires on the first time it happens. |
| Score crosses threshold | Track (Prospect or Customer), direction, and threshold |
Then set Timeout — wait at most in days, weeks, or months. The default is 7 days. A contact who hasn’t done it by then takes the Timeout path.
The confidence floor asks how sure RadarSend has to be that a real person clicked or visited, not a security scanner. Use workspace default is the safest choice. Clicks and visits count only once RadarSend has checked them, which takes a few minutes. See How open & click tracking works.
A is your sequence’s one branching step. See Branching limits.
If / else#
Splits the flow into a Yes path and a No path. Choose a condition type:
- Based on engagement with an earlier email — did the contact open, click, receive (was delivered), or bounce a particular earlier email? You can add a Within window, such as 2 days. Left blank, it looks back to when that email was sent. Only send steps that come earlier in the flow can be chosen.
- Based on segment or list membership — Is in or Is not in a segment or list.
- Clicked a link / Visited a page — whether they’ve clicked a matching link or viewed a matching page, optionally within a recent window. Blank fields match any link or page.
- Based on a contact field — a field, a comparison (equals, does not equal, greater than, less than, is set, is not set), and a value. Greater than and less than appear for number and currency fields. Is not set is offered for standard fields only.
- Based on an advanced condition — the full segment rule builder, for anything the simpler options can’t express.
The two paths are labeled Yes and No on the canvas. They don’t join back up: each runs to its own end.
Go to sequence#
Hands the contact off: they leave this sequence and are enrolled in another one. Choose the target under Continue in which sequence?. Only active sequences are listed, and the current one isn’t.
The contact’s time in this sequence ends here, and their numbers from this point on appear on the target sequence’s report.
If the target is paused while someone edits it, contacts arriving at the handoff wait instead of dropping out, and continue once it resumes. They wait up to 7 days. After that they leave with the reason The next sequence was unavailable.
Action#
Changes the contact’s record instead of sending an email. Under What should happen?, choose:
- Add to list — add them to a static list.
- Remove from list — take them out of one. Only static lists are offered for both: a dynamic segment’s members come from its rules, so contacts can’t be added to or removed from one.
- Set a field — choose the Field, a Mode (Overwrite or Set only if empty, plus Increment and Decrement for numbers, and Add tag and Remove tag for tag fields), and the value.
- Change stage — move them to a Target stage.
- Call a webhook — send the contact to another system. Under Destination, pick one of your saved webhooks (Manage webhooks → to add one), or click Use a one-off URL instead and enter a One-off URL, with an optional HMAC secret (a shared key that lets the receiver check the request came from you). A one-off URL is always sent as a
POST; a saved webhook uses the method it was saved with. See Send webhooks to other apps for what’s sent and how to verify it.
Exit / goal#
Ends the path. It has no settings. A contact who reaches it leaves the sequence and counts as Converted on the report, because an Exit step marks the ending you were aiming for.
A path that runs out of steps also ends the sequence for that contact, but it counts as Completed instead. Use an Exit step where reaching the end means success, and leave it off where it doesn’t.
The conversion goal#
The goal is a setting for the whole sequence, not a step. Set it on the Goal card on the Settings tab, or with the target button in the builder header.
When a contact does what the goal describes, they leave the sequence as Converted, wherever they are in the flow at the time.
- Did the contact… (which email?) — any send step in the sequence.
- Signal — opened, clicked, was delivered, or bounced.
- Within (optional) — a window such as 2 days. Left blank, it looks back to when that email was sent.
A goal is optional. You can change it at any time, including while the sequence is live.
Branching limits#
Two limits apply to branching today:
- One branching step per sequence. Once the flow forks, Wait for event is greyed out, with the note One branching step per sequence in this cut.
- No branches inside branches. On a path that’s already a branch, If / else is greyed out, with the note No nested branching in this cut.
For richer branching, end a path with Go to sequence and hand contacts to another sequence that forks again.
Common issues#
When a sequence won’t activate, RadarSend marks the steps at fault with a red note under each one. Work down the marked steps; the note says which of these it is.
- A Send step mentions the email type. No Subscription type is chosen. Open the email picker and pick one.
- No senders to choose from. No confirmed sender matches that subscription type. See Add & confirm a sender.
- A Send step asks you to choose a sender. Pick a Send from in the email picker.
- An If / else has no condition. It was added but never set up. Open it and choose a condition type.
- An engagement condition can’t find an email to check. It asks about an email that comes after it, or there’s no email before it at all. Move the branch later, or add a send step ahead of it.
- A step is unreachable. Nothing leads to it. Connect it to the flow or delete it.
- A Wait step is flagged. Its delay or date hasn’t been set.
- A Wait for event is flagged about its paths. One of its two paths is empty. Add a step to the Event or Timeout side.
- An Action step says only a static list takes members, or that its list no longer exists. It points at a segment, or at a deleted list. Open it and pick a list.
- A Go to sequence step is flagged about its target. You can only hand off to a sequence that’s active, or paused while someone edits it. Activate the target first.
- A step is greyed out in the menu. The flow already forks, or you’re inside a branch. See Branching limits.
Some of these messages include a long internal reference for the step. You can ignore it; the marked step on the canvas is the one to fix.
Good to know#
- Send steps keep their email version. Library edits don’t change what a sequence sends until you adopt the new version on that step.
- Branches never rejoin. Once a contact goes down Yes or No, that path runs to its own end.
- Waits aren’t to-the-second. RadarSend checks for contacts who are due about every 30 seconds, so “wait 1 hour” means about an hour. That’s fine for waits measured in hours or days, but don’t rely on it for minute-precise timing.
- Sequence email is capped per contact. By default, a contact gets at most 2 sequence emails a day and 5 a week, counted across all your sequences. An email that would go past that is skipped, not delayed, and the contact carries on through the flow.